Programming: ESP8266
Check out my other articles / projects:
- ESP8266 as a Web Server
- ESP8266 Access Point configuration GUI
- ESP8266 / OLED Calendar
- ESP8266 / OLED Date Selector
ESP8266 as a Web Server
I bought an Amica ESP8266 board and an 128x64 OLED / SSD1306 simply to have a play and with no real application in mind. Hence when it came to build something, I was scratching around trying to think of something to actually build. The project below takes the sample project provided with the ESP8266 that allows you to toggle an LED on and off via a web page and extends it to four (wow!) LEDs and incorporates the display to echo out the current status of the device.
- Overview
- Code Fragments
- Connecting to the WiFi
- Listening for Web Requests
- Responding to Web Requests
- Controlling the OLED Display
- Downloads
Overview
The ESP8266 can be programmed in one of two ways - using LUA a lightweight language intended for embedded applications or via the Arduino development environment. As I was familiar with the Arduino environment, I started there and have not experienced any problems or limitations.
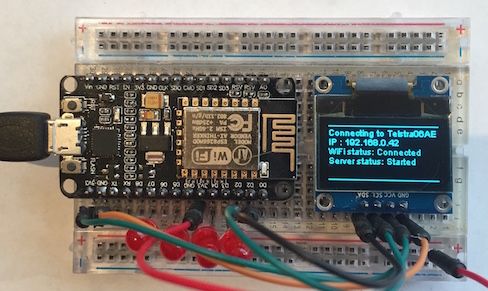
The application has two basic modes - an initialisation mode when it connects to the WiFi and a running mode where it waits for incoming requests from the web. The image below shows the connection status displayed on the OLED screen after a successful connection. The screen details the WiFi name and the IP address it has been assigned.

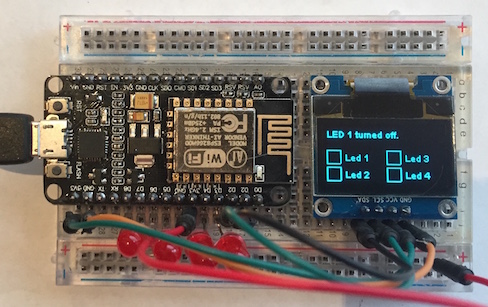
Changing an LED's status via the web page results in the current status for all LEDs to be displayed. The status are shown as checkboxes with checked indicating the LED is on. To conserve power, the display is turned of after a period of inactivity and is turned back on to display status changes for a short period (approximately 2 seconds).

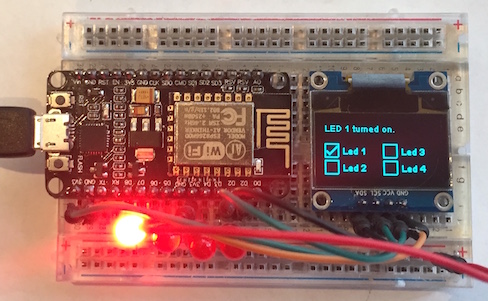
Turning an LED on via the website results in an immediate change on the device itself. Again, the display reflects the current status.

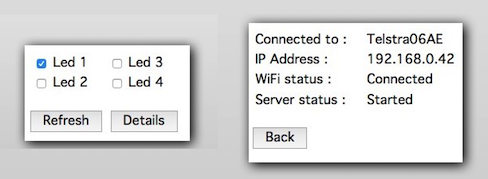
The website mimics the display on the device itself. Clicking a checkbox updates the corresponding LED whereas clicking the Details button echoes out the current status and assigned IP address.

Code Fragments
The following code highlights areas of interest in the application. It is not intended to be a tutorial or a complete solution. I have provided the complete code for download and you may use or modify it as required.
Connecting to the WiFiConnecting to the WiFi involves only a few calls and all contained within the setup() initialisation routine and therefore only occurs once. I have not tested what happens if the connection is lost but assume my application would never reconnect - a future version of the code might split this into a separate function and reconnect to the WiFi if ever the connection is lost.
001 002 003 004 005 006 007 008 009 010 011 012 013 014 015 016 017 018 019 020 021 022 023 024 025 026 |
WiFiServer server(301);

const char* ssid = "Telstra06AE";
const char* password = "********";

void setup() {

  ...

  // Connect to WiFi network ..

  WiFi.begin(ssid, password);

  while (WiFi.status() != WL_CONNECTED) {
    ... update the screen to show activity.
  }

  Str2 = String("IP : " + IpAddress2String(WiFi.localIP()));
  .. update the screen with the assigned IP address.


  // Start the server ..

  server.begin();

}
|
The ESP8266 can act as a WiFi client, server or both. When acting as a webserver, the server must be initialised with the port it is to listen on, as shown in line 001. The connection is started at line 012 and progress can be monitored via the status() method. This may take a few seconds and lines 014 - 016 are used to loop until the connection is complete - again this minimalist code will circle forever if no WiFi signal is found or invalid SSID / credentials are supplied.
Listening for Web Requests
Once initialisation is complete, the application enters the loop() and waits for a request to turn on or off a button. Changes to the LED status are via an HTTP GET request in the form of http://{ip address}:{port number}/{ON|OFF}{LED Number}, such as http://192.168.0.42:301/ON3. Other requests, such as refresh a status refresh or connection details are activated by substituting the keywords REFRESH and DETAILS after the server IP address and post numbers.
001 002 003 004 005 006 007 008 009 010 011 012 013 014 015 016 017 018 019 020 021 022 023 024 025 026 027 028 029 030 031 032 033 034 035 036 037 038 039 040 041 042 043 044 045 046 047 048 049 050 051 |
void loop() {


  // Check if a client has connected ..

  while (WiFi.status() != WL_CONNECTED) { delay(500); }
  WiFiClient client = server.available();

  if (!client) {
    return;
  }


  // Wait until the client sends some data ..

  while (!client.available()) {
    delay(1);
  }


  // Read the first line of the request ..

  String req = client.readStringUntil('\r');
  client.flush();


  // Parse the request for actions ..

  validRequest = false;

  if (req.indexOf("GET / ") != -1)    { validRequest = true; }

  if (req.indexOf("/OFF1") != -1)     { led1 = false;
                                        validRequest = true;
                                        digitalWrite(LED1_PIN, HIGH); }
  if (req.indexOf("/ON1") != -1)      { led1 = true;   ...
  if (req.indexOf("/OFF2") != -1)     { led2 = false;  ...
  if (req.indexOf("/ON2") != -1)      { led2 = true;   ...
  if (req.indexOf("/OFF3") != -1)     { led3 = false;  ...
  if (req.indexOf("/ON3") != -1)      { led3 = true;   ...
  if (req.indexOf("/OFF4") != -1)     { led4 = false;  ...
  if (req.indexOf("/ON4") != -1)      { led4 = true;   ...

  if (req.indexOf("/REFRESH") != -1)  { validRequest = true;
                                        Str6 = "Current Status :"; }
  if (req.indexOf("/DETAILS") != -1)  { validRequest = true;
                                        screenMode = MODE_INIT; }

  ...

}
|
Line 006 attempts to reconnect the device in the event that it was disconnected for some reason using the same SSID and password provided in the init() code. This does not allow for the device to move from one WiFi connection to another but could be altered to have a number of SSIDs and passwords which the application cycled through looking for a contactable network.
Lines 007 - 011 retrieves a reference to any client that may have connected. If not client connection was found, the loop is aborted and processing starts again. If a connection is found, the program pauses until the client sends or completes sending data (line 016 - 018). The request is read and stored up to the first line up to carriage return (\r) and the remainder discarded (lines 023 - 024).
Line 031 ensures that the request is both an HTTP GET and from the root directory. Lines 036 - 042 handle the requests to turn on or off the four LEDs directly. Finally, lines 044 - 047 hand requests for a status refresh or connection details. Whenever a request is detected and acted on, a flag named validRequest is set on indicating that the screen should reflect the change in status and that a response should be returned to the client.
Responding to Web Requests
The web responses and OLED displays mimic each other and provide two simple modes - connection information and status details The code below shows the code required to render the LED status page. When a URL ends (or more accurately contains) the keyword REFRESH, the code below echoes the status of the LEDs to the client in simple HTML table.
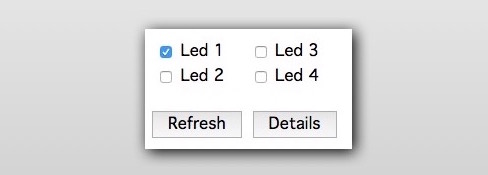

The code is simple enough - lines 007 to 016 define a JavaScript function that is called when a user changes a checkbox. It refreshes the URL of the browser with the appropriate status - ON or OFF - and LED number appended to the base URL of the application.
001 002 003 004 005 006 007 008 009 010 011 012 013 014 015 016 017 018 019 020 021 022 023 024 025 026 027 028 029 030 031 032 033 034 035 036 037 038 039 040 041 042 043 044 045 046 047 048 049 050 |
client.flush();
client.print("HTTP/1.1 200 OK\r\n");
client.print("Content-Type: text/html\r\n\r\n");
client.print("<!DOCTYPE HTML>\r\n<html>\r\n");
client.print("<head>");
client.print("<style>* {font-size:1.0em; font-family:Geneva;} </style>");
client.print("<script type=\"text/javascript\">");
client.print("function checkAlert(checkbox, ledNumber) {");
client.print("  if (checkbox.checked==true) {");
client.print("    window.location.href = \"/ON\" + ledNumber");
client.print("  }");
client.print("  else {");
client.print("    window.location.href = \"/OFF\" + ledNumber");
client.print("  }");
client.print("}");
client.print("</script>");
client.print("</head>");
client.print("<body>");
client.print("<form name=\"frmMain\">");
client.print("  <table border=\"0\">");
client.print("    <tr>");
client.print("      <td><input onclick=\"checkAlert(this, '1')\"
                               type=\"checkbox\" ");
client.print(led1 ? "checked" : "");
client.print("            /> Led 1  </td>");
client.print("      <td><input onclick=\"checkAlert(this, '3')\"
                               type=\"checkbox\" ");
client.print(led3 ? "checked" : "");
client.print("            /> Led 3  </td>");
client.print("    </tr>");
client.print("    <tr>");
client.print("      <td><input onclick=\"checkAlert(this, '2')\"
                               type=\"checkbox\" ");
client.print(led2 ? "checked" : "");
client.print("            /> Led 1  </td>");
client.print("      <td><input onclick=\"checkAlert(this, '4')\"
                               type=\"checkbox\" ");
client.print(led4 ? "checked" : "");
client.print("            /> Led 3  </td>");
client.print("    </tr>");
client.print("  </table>");
client.print("</form>");
client.print("<br>");
client.print("<input type=\"button\"
                    onclick=\"location.href='/REFRESH'\"
                    value=\"Refresh\"> ");
client.print("<input type=\"button\"
                    onclick=\"location.href='/DETAILS'\"
                    value=\" Details \">");
client.print("</html>\n");
|
Lines 022 - 025 render out the checkbox associated with LED 1. The attribute checked is inserted into the checkbox element if the LED is lit - reflected in the led1 variable. This is repeated for LEDs 2, 3 and 4 between lines 026 and 039 with the only changes to the code a reference to the correct variable and parameters to the checkAlert() function for the corresponding LED.
The code below is used to display the second mode - a connection details screen. It echoes out the SSID name of the WiFi connection, the IP address that has been allocated and the WiFi / server status. I have cheated a little on these last two points and have simply hardcoded them as the client would never get if they were anything other than connected and active.
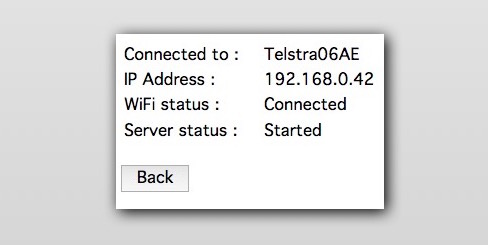

The code is pretty self-explanatory. The only interesting point is the function to print out a formatted IP address. The method WiFi.localIP() returns a 4 bytes (unsigned char) array which needs to be formatted to the typical format of 192.168.0.45.
001 002 003 004 005 006 007 008 009 010 011 012 013 014 015 016 017 018 019 020 021 022 023 024 025 026 027 028 029 030 031 |
client.flush();
client.print("HTTP/1.1 200 OK\r\n");
client.print("Content-Type: text/html\r\n\r\n");
client.print("<!DOCTYPE HTML>\r\n<html>\r\n");
client.print("<head>");
client.print("<style>* {font-size:1.0em; font-family:Geneva;} </style>");
client.print("</head>");
client.print("<body>");
client.print("<table border=\"0\">");
client.print("<tr><td>Connected to :  </td><td>");
client.print(ssid);
client.print("</td></tr>");
client.print("<tr><td>IP Address :</td><td>");
client.print(IpAddress2String(WiFi.localIP()));
client.print("</td></tr>");
client.print("<tr><td>WiFi status :</td><td>Connected</td></tr>");
client.print("<tr><td>Server status :</td><td>Started</td></tr>");
client.print("</table>");
client.print("<br><input type=\"button\" value=\"Back\"
              onclick=\"location.href='/REFRESH'\">");
client.print("</html>\n");


String IpAddress2String(const IPAddress& ipAddress) {

  return String(ipAddress[0]) + String(".") +\
  String(ipAddress[1]) + String(".") +\
  String(ipAddress[2]) + String(".") +\
  String(ipAddress[3])  ;

}
|
Controlling the OLED Display
I bought the 0.96" OLED display on eBay from a local Australia company, Logicware, simply because he was prepared to support people who purchased from him and had spent some time making sure that he could get the devices to work with the freely available libraries. I played with a number of libraries until I found the library developed by Daniel Eichorn which is available on GitHub (esp8266-oled-ssd1306).
I was using version 2 of this library and even at this level is really quite advanced. Version 3, released early Jun '16, adds new features and performance festures. Its great to see the authors haven't rested on their laurels and are actively improving it.
The sample code that comes with the library showcases the features of the library with particular emphasis on its presentation foundation, frames and overlays. Frames can be used to display a particular screen and these collected into a frameset which can be cycled through in sequence to display a number of screens of information on these tiny screens. The library even provides different transition effects and provides navigation guides similar to those on an Apple that indicate which application page you are on. Overlays provide a mechanism to superimpose information over the top of whichever frame is being displayed - hence the term overlay. Both of these functions are implemented using callbacks from the framework.
As it turned out, all this functionality was great but for my simple application I ended up not using a lot of it. If implemented using frames and overlays, my application would have one frame and no overlays! I have provided two versions of the code below - one in its simplest form, the second using the frames and overlays provided by the UI library.
001 002 003 004 005 006 007 008 009 010 011 012 013 014 015 016 017 018 019 020 021 022 023 024 025 026 027 028 |
// Pin definitions for I2C
#define OLED_SDA    D1  // pin 14
#define OLED_SDC    D2  // pin 12
#define OLED_ADDR   0x3C

SSD1306          display(OLED_ADDR, OLED_SDA, OLED_SDC);

void drawFrame() {

  display.setFont(ArialMT_Plain_10);
  display.setTextAlignment(TEXT_ALIGN_LEFT);
  display.drawString(0, 2, "Hello World");

  ...

  display.display();

}

void setup() {

  void resetDisplay(void);

  drawFrame();

  ...

}
|
Lines 002 - 006 define the pins used by the OLED display and initialise the display object which provides all of the functions to draw pixels, rectangles, circles, images and to print text in a number of fonts and font-sizes. Line 014, resets the display ready for use within the setup() routine.
The drawFrame() method sets the font to Arial in 10pt, the text alignment to left and then prints the ubiquitous 'Hello World' on the screen at position 0, 2. The final line, display.display() writes the screen buffer out effectively updating the display.
The code below shows the same application using the frames and overlays provided by the UI library:
001 002 003 004 005 006 007 008 009 010 011 012 013 014 015 016 017 018 019 020 021 022 023 024 025 026 027 028 029 030 031 032 033 034 035 036 037 038 039 040 041 042 043 044 045 046 047 048 |
// Pin definitions for I2C
#define OLED_SDA    D1  // pin 14
#define OLED_SDC    D2  // pin 12
#define OLED_ADDR   0x3C

SSD1306          display(OLED_ADDR, OLED_SDA, OLED_SDC);    // For I2C
SSD1306Ui ui     ( &display );

bool drawOverlay(SSD1306 *display, SSD1306UiState* state) {
  return true;
}

bool drawFrame(SSD1306 *display, SSD1306UiState* state, int x, int y) {

  display->setFont(ArialMT_Plain_10);
  display->setTextAlignment(TEXT_ALIGN_LEFT);
  display->drawString(0, 2, "Hello World");

  ...

  return false;

}

int frameCount = 1;
int overlaysCount = 1;

bool (*frames[])(SSD1306 *display, SSD1306UiState* state, int x, int y)
			= { drawFrame };

bool (*overlays[])(SSD1306 *display, SSD1306UiState* state)
			= { drawOverlay };

void setup() {

  // Cycle through the initialization

  void resetDisplay(void);

  // Add frames and overlays ..

  ui.setFrames(frames, frameCount);
  ui.setOverlays(overlays, overlaysCount);
  ui.init();

  ...

}
|
Lines 002 - 007 define the pins used by the OLED display and initialise the framework. Ultimately, this creates two objects - the display and the ui. As shown above, the display object provides all of the functions to draw pixels, rectangles, circles, images and to print text in a number of fonts and font-sizes. The ui object provides access to the frames and overlays described above.
Jumping to lines 028 through 032, two arrays are defined and initialised with the callbacks for the frames and overlays, respectively. The callbacks, defined between lines 009 and 023 are used to draw one overlay or frame. Where an application utilizes multiple frames, a corresponding callback for each frame must be defined and these enumerated in the callback array - as shown in bold.
001 002 003 004 005 006 007 008 009 010 011 012 013 014 015 016 017 |
bool drawOverlay(SSD1306 *display, SSD1306UiState* state) {
  ...
}

bool drawFrame1(SSD1306 *display, SSD1306UiState* state, int x, int y) {
  ...
}

bool drawFrame2(SSD1306 *display, SSD1306UiState* state, int x, int y) {
  ...
}

bool (*frames[])(SSD1306 *display, SSD1306UiState* state, int x, int y)
			= { drawFrame1, drawFrame2 };

bool (*overlays[])(SSD1306 *display, SSD1306UiState* state)
			= { drawOverlay };
|
As shown in the early listing, the UI object must be initialised with the frame and overlay callback arrays as shown in lines 042 to 044. The library provides numerous methods to control the transitioning between frames and the symbol used to indicate which frame is being displayed amongst other things. It really is a very comprehensive library!
Downloads
Feel free to download, modify and adapt this code to your needs. Please credit me if you use some or all of this code in your own project.
 |
ESP8266 / OLED Simple code | |
 |
ESP8266 / OLED Frames and Overlay code |


