Programming: Arduino
Check out my other articles:
- Galaga: Failed Attempt at writing a Game
- Sudoku
- Blockade / Snake
- Farkle
- Minesweeper
- Blackjack
- ADC Graph
- Analogue Clock
- Tetris
Farkle
Farkle is a simple dice game that pits players against each other and themselves. I already have a version of this game on the Apple Store but I wanted to convert it to the run on the Arduino. To test the capabilities of the platform and the SmatGPU2, I tried to maintain all of the original features of the iPhone version.
Overview
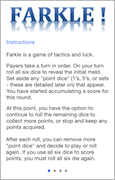
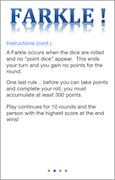
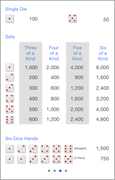
The instructions of the game are detailed in the following screen shots which have been lifted straight from my iPhone version.
 |
 |
 |
 |

Game Play
My version of Farkle allows up to four players to compete against each other. After an initial splash screen is shown, the number of players can be selected by pressing the plus and minus buttons at the bottom of the screen. Adding an additional player highlights there face allowing you to customise their image and name.
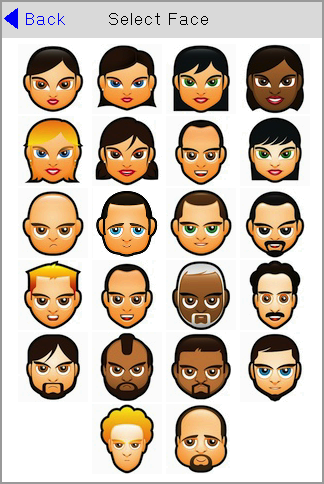
Clicking on the players face reveals a selection of male and female faces to choose from. The graphics have been supplied with permission by www.deleket.com, thanks again! Finally, users can click on the player's name and type in their own name using a variation of the keyboard code supplied by Vizic Technologies the makers of the SmartGPU2 display.
 |
 |
 |
 |

Players take turns throwing the dice and accumulating their score but risk losing 500 points if they throw a Farkle (a non-point scoring hand). Dice are selected from the current throw in the upper section of the screen with those selected grey out to indicate this. Users can roll again or take the score if they have achieved a score of 300 or more and pass play to the next player. As play moves from one player to the next, a history of the player's previous rolls are shown at the bottom of the screen.
Throwing a Farkle is a costly mistake and results in a loss of 500 points. The next player in a multi-player game is displayed in the lower corner of the screen. After ten rounds, an awards screen shows the final scores for each player.
 |
 |
 |
 |

Code Fragments
The following code highlights areas of interest in the application. It is not intended to be a tutorial or a complete solution. I have provided the complete code for download and you may use or modify it as required.
Inner ClassesInner classes are supported in C, C++ and pretty much every other object-oriented language. I originally thought that the Arduino could handle inner classes but developing Farkle taught me that although it is possible to declare and use inner classes, they do not behave exactly as I would have liked.
The inner class below describes a single player with properties such as their display name, image name and current scores. To save code and memory, the properties are declared public rather than wrapping them within getters and setters. A series of arrays store the history of the user's last ten rolls and these are maintained using a method called addThrowHistory which accepts the details of the current roll and 'pushes' them onto FIFO stack.
A second method, reset clears the stack and all other variables and is used at the start of each game.
001 002 003 004 005 006 007 008 009 010 011 012 013 014 015 016 017 018 019 020 021 022 023 024 025 026 027 028 029 030 031 032 033 034 035 036 037 038 039 040 041 042 043 044 045 046 047 048 049 050 051 052 053 054 055 056 057 058 059 060 061 062 063 064 065 066 067 068 069 070 071 072 073 074 075 076 077 078 079 080 081 082 |
class Player {

  public:

  boolean enabled;
  char* playerName;
  char* imageName;
  char playerNameLength;
  int runningScore;
  int grandScore;
  int throwNumber;
  int playerNumber;

  char die1[10];
  char die2[10];
  char die3[10];
  char die4[10];
  char die5[10];
  char die6[10];
  char throwNo[10];
  int thisScore[10];
  int totalScore[10];
  boolean divider[10];

  void addThrowHistory(int throwNoValue, int dValue1, int dValue2,
                       int dValue3, int dValue4, int dValue5, int dValue6,
                       int thisScoreValue, int totalScoreValue,
                       boolean dividerValue) {

    for (int x = 8; x >= 0; x--) {

      die1[x + 1] = die1[x];
      die2[x + 1] = die2[x];
      die3[x + 1] = die3[x];
      die4[x + 1] = die4[x];
      die5[x + 1] = die5[x];
      die6[x + 1] = die6[x];
      throwNo[x + 1] = throwNo[x];
      thisScore[x + 1] = thisScore[x];
      totalScore[x + 1] = totalScore[x];
      divider[x + 1] = divider[x];

    }

    die1[0] = dValue1;
    die2[0] = dValue2;
    die3[0] = dValue3;
    die4[0] = dValue4;
    die5[0] = dValue5;
    die6[0] = dValue6;
    throwNo[0] = throwNoValue;
    thisScore[0] = thisScoreValue;
    totalScore[0] = totalScoreValue;
    divider[0] = dividerValue;

  }

  void reset(int playerNo) {

    runningScore = 0;
    grandScore = 0;
    throwNumber = 1;
    playerNumber = playerNo;

    for (int i=0; i<=10; i++) {

      die1[i] = 0;
      die2[i] = 0;
      die3[i] = 0;
      die4[i] = 0;
      die5[i] = 0;
      die6[i] = 0;
      throwNo[i] = 0;
      thisScore[i] = 0;
      totalScore[i] = 0;
      divider[i] = false;

    }

  }

};
|
Wrapping the logic of a player in a single class allows it to be passed to functions as a parameter, right? Wrong. This is the first thing I discovered about inner classes in Arduino - the compiler is simply not smart enough to compile the following piece of code ..
001 002 003 |
void someFunction(Player *thePlayer) {

}
|
The compiler spits out the following errors:
001 002 003 |
farkle:126: error: variable or field 'someFunction' declared void farkle:126: error: 'Player' was not declared in this scope farkle:126: error: 'thePlayer' was not declared in this scope |
A search of the forums reveals the following post http://forum.arduino.cc/index.php/topic,41848.0.html which seems to describe the problem.
The Arduino IDE automatically generates prototypes for your functions. Unfortunately, this doesn't work for functions whose arguments or return value are types defined in the sketch, since the prototypes get inserted above the type definitions. I'm not sure there's really a good workaround for this.
I finally gave up and simply declared four instances of my class for the four possible players and a 'spare' reference (lines 001 - 005) that I assign to the current player (line 020 in the Setup routine starts the game with referencing the first player. All of the functions in the program refer to the global variable player.
A function called setNetUser() is called at the end of a player's turn to determine who the next player is based on the number of players in the game. For example, if the current player is the second player (line 040) and there are more than two players in the game (line 041) then the current player reference is updated to the third player (line 042). If there were only two players in the game, then the current player reference is updated to the first player (lines 044 - 046).
001 002 003 004 005 006 007 008 009 010 011 012 013 014 015 016 017 018 019 020 021 022 023 024 025 026 027 028 029 030 031 032 033 034 035 036 037 038 039 040 041 042 043 044 045 046 047 048 049 050 051 052 053 054 055 056 057 058 059 060 061 062 063 064 |
Player *player1;
Player *player2;
Player *player3;
Player *player4;
Player *player;

...

void setup() {

   ...

  player1 = new Player();
  player2 = new Player();
  player3 = new Player();
  player4 = new Player();

  ...

  player = player1;

}

...

void setNextUser() {

    switch (player->playerNumber) {

        case 1:
            if (numberOfPlayers > 1) {
                player = player2;
            }
            else {
                player = player1;
            }
            break;


        case 2:
            if (numberOfPlayers > 2) {
                player = player3;
            }
            else {
                player = player1;
            }
            break;

        case 3:
            if (numberOfPlayers > 3) {
                player = player4;
            }
            else {
                player = player1;
            }
            break;

        case 4:
            player = player1;
            break;

    }

}
|
Wiring Diagram
The diagram below show the wiring diagram when using a standard Arduino Uno (or compatible) and the SmartGPU2. Click on the images to see a detailed drawing.


Downloads
Feel free to download, modify and adapt this code to your needs. Please credit me if you use some or all of this code in your own project. If you alter the code to fix bugs or add functionality, please submit them back to me and I will add them to the download.
 |
Arduino Source Code |


