Collision Detection: Difference between revisions
No edit summary |
No edit summary |
||
| Line 44: | Line 44: | ||
Serial.println(arduboy.collision(p, r)); | Serial.println(arduboy.collision(p, r)); | ||
</pre> | |||
[[File:Collision 00.png|thumb]] | [[File:Collision 00.png|thumb]] | ||
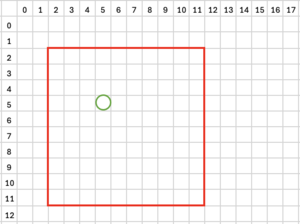
Running the above code will print 1 as the point at position 5, 5 is in the centre of the square whose top left corner is at position 2, 2 and lower right corner is at 11, 11. | Running the above code will print 1 as the point at position 5, 5 is in the centre of the square whose top left corner is at position 2, 2 and lower right corner is at 11, 11. | ||
Revision as of 02:05, 16 August 2024
Background
The Arduboy2 library provides functions to detect when two rectangles or a rectangle and a point overlap. It is implemented in such a way that is independent of other constructs such as the screen and sprites. In practice though, the detection of collisions is often focused on the collision of sprites (players, bullets, etc) with other entities (enemy sprites, background elements or other play elements). These collisions may occur onscreen or off and functions within the library are flexible enough to cater for this.
The following examples and code assume you are familiar with the concept and functions available to render sprites. More information on this can be found in the article covering the Sprites / SpritesB Library.
But how does the collision detection work?
The Arduboy2 library provides two collision detection methods which are shown below.
bool collide(Point point, Rect rect);
bool collide(Rect rect1, Rect rect2);
It also provides two structures to assist.
struct Rect {
  int16_t x;
  int16_t y;
  uint8_t width;
  uint8_t height;
};

struct Point {
  int16_t x;
  int16_t y;
};
The structures describe a rectangle and a point in space - the x / y coordinates are arbitrary and their origin can be anywhere but it typical to align these with screen's coordinates. Thus 0, 0 is located at the top-left corner of the screen with negative x and y values representing locations to the left and above the screen respectively.
The first function tests to see if a point is contained within the specified rectangle. The sample code below demonstrates this:
Point p;
Rect r;

p.x = 5;
p.y = 5;

r.x = 2;
r.y = 2;
r.width = 10;
r.height = 10;

Serial.println(arduboy.collision(p, r));

Running the above code will print 1 as the point at position 5, 5 is in the centre of the square whose top left corner is at position 2, 2 and lower right corner is at 11, 11.
p.x = 20;
p.y = 20;

Serial.println(arduboy.collision(p, r));
Will print 0 as the point at position 20, 20 is outside of the square whose top left corner is at position 5, 5 and lower right corner is at 15, 15.
The second function compares the position of two rectangles and tests to see if there is any overlap. This is demonstrated in the code below:
Rect r1 = {12, 8, 16, 16};
Rect r2 = {16, 20, 16, 16};

Serial.println(arduboy.collision(r1, r2));
Will print 1 as the two rectangles overlap. The first rectangle’s top left corner is at 12, 8 and its lower right corner is at 28, 24. The second rectangle’s top left corner is at 16, 20 and its lower left corner is at 32, 36.
r1.x = 40;
r1.y = 40;

Serial.println(arduboy.collision(r1, r2))
Will print 0 as the two rectangles do not overlap anymore. The first rectangle’s top left corner is now at 40, 40 and its lower right corner is at 56, 56. The second rectangle’s top left corner is at 16, 20 and its lower left corner is at 32, 36.
One (minor) issue with the detection code is that when detecting collisions, you need to construct the ‘rectangle’ and ‘point’ structures based on the positions of the players and obstacles in the game.
Serial.print("A collides with B : ");
Serial.println(arduboy.collide( (Rect){xA, yA, 16, 16}, (Rect){xB, yB, 16, 16} ));
In the sample code aboce, two rectangle structures are populated with the current positions of the moving squares and the image size (16 x 16 pixels). This is relatively simple when there are only a few objects to consider but can become a little more complex and error prone if there are numerous objects with different sizes.
A typical design pattern for action games is to define a class to hold information about players including their current position. A sample header and implementation class is shown below
Player.h:

#include "Arduboy2.h"

class Player {

   public:
     Rect getRect();

   int16_t x;
   int16_t y;
   const uint8_t *bitmap;

};


Player.cpp:

#include "Player.h"
#include "Arduboy2.h"

Rect Player::getRect() {

  return (Rect){x, y, pgm_read_byte(bitmap), pgm_read_byte(bitmap + 1)};

}
The header declares three public variables for the player’s coordinates and the image used when rendering the screen. It also prototypes a function that will return a rectangle structure that will describe the area on screen that the player currently occupies. The implementation of that function is included in the .cpp file. It simply creates and returns a populated Rect structure using the ‘x’ and ‘y’ coordinates from the class itself and the width and height of the image by reading these from the image array itself.
The code below shows the declaration of two player objects and shows how they can be used when testing collisions.
Player playerA;
Player playerB;

playerA.x = 20;
playerA.y = 12;
playerA.bitmap = squareA;

playerB.x = 100;
playerB.y = 24;
playerB.bitmap = squareB;

...

Serial.print("A collides with B : ");
Serial.println(arduboy.collide(playerA.getRect(), playerB.getRect()));
In my opinion, this approach results in much more readable code.
The simple collision application and the ‘advanced’ version using a ‘Player’ class can be found in my repository.
https://github.com/filmote/Collide_Article1 (simple example) https://github.com/filmote/Collide_Article2 (using the ‘Player’ class).